Administration
Examination- Assessments/Tests
Formal and Practice Examinations
Formal and practical examinations are created and managed under the Examination module. All created examinations are displayed on the Examination module main page.
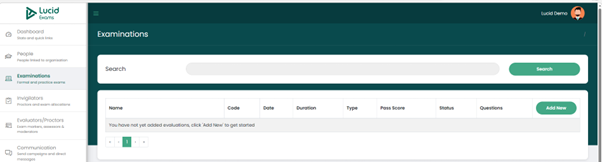
The data columns on the Examinations main page consist of:
- Name: the name of the examination
- Code: the code of the examination
- Date: the examination commencement date
- Duration: the duration of the examination in hours and minutes
- Type: the examination type, which will be between the two exam types:
- Formal exam
- Practice exam
- Pass score: the minimum pass mark to be obtained by the exam takers for the examination.
- Status: the status of the examination, which can be between being a
- Draft
- Published
- Unpublished
- Archived.
- Questions: the number of questions available in the exam
Creating An Examination Record
Capturing a New Examination Record into The System
To get started, click on the “ADD NEW” button, you will be redirected to the below page where you can capture the exam details.

To create an examination record, fill in the following data fields:
- Title: the examination title
- Code: the examination code
- Pass score: the exam pass mark.
- Max attempts (0=no limit): the number of attempts exam takers may attempt to pass the exam. 0(zero) means the exam takers can take the exam as many times as they possibly can until they pass.
- To be completed within a timed session: specify if the exam will be completed within a timed session or not, by indicating using the “YES” or “NO” answer options.
- Duration hrs: duration hours are added if the exam is to be completed within a timed session.
- Duration mins: duration minutes are added if the exam is to be completed within a timed session.
- Candidate instructions: add exam instructions that the candidates need to adhere to.
Once all the details have been added, click on the “Create” button, and the examination record will be created and saved.
The Formal And Practice Examinations Display Page
Examination Records Display Main Page
The saved record is displayed on the Examination’s Module main page.
A created exam record has an “Options” column with a dropdown list with different functions.
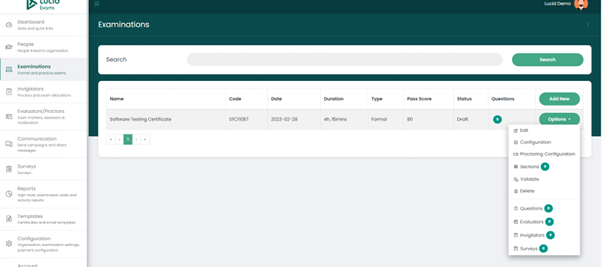
Per the examination record you can do the following functions:
- Edit the exam record.
- Configure the examination.
- Configure the exam proctoring details.
- Create and manage the examination sections.
- Validate the examination after adding the examination questions.
- Publish or unpublish the examination.
- Archive the examination.
- Delete/remove the examination.
- Create examination questions.
- Assign evaluators to the examination.
- Assign invigilators to the examination.
- View surveys linked to the examination.
Updating Examination Record Information
Editing The Examination Details
You can make changes to the Examination record by clicking on the “Edit” button on the Options dropdown list.
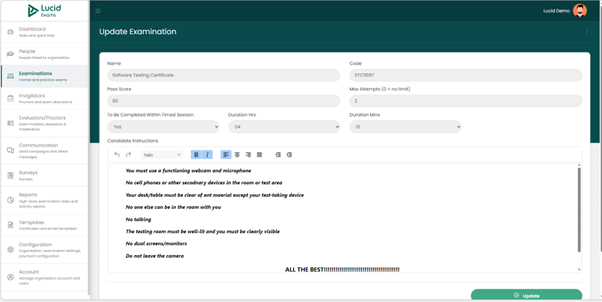
You can edit the following data fields:
- Name: the name of the exam
- Code: the code of the exam
- Pass score: the pass mark of the exam.
- Max attempts: the maximum number of attempts to pass the exam. Zero means there is no limit.
- To be completed within the timed session: specify if the exam will be completed within the timed session by selecting the “YES” option or if it will not be within a timed session by selecting the “NO” option.
- Duration hrs: the number of hours for the exam
- Duration mins: the number of minutes for the exam
- Candidate instructions: the instructions directed to the candidates.
Once all changes have been made, click on the “Update” button to have the changes saved.
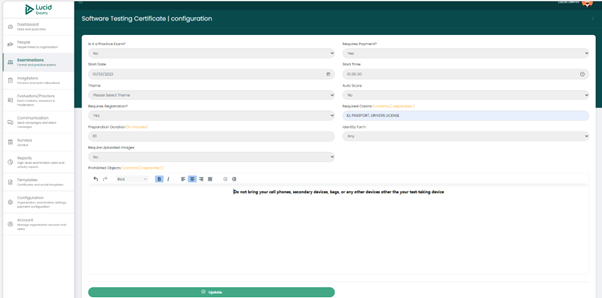
Examination Configuration
Customisation Of The Examination
On the exam configuration page, you have to complete the data fields displayed, which consist of:
- Is it a practice exam? you have two options to select from, YES and NO.
- Select “YES” if it is a practice exam.
- Select “NO” if it is a formal exam (not a practice exam)
- Requires payment? if the exam requires payment, select the “YES” option, if it does not require payment, select the “NO” option.
- Start date: the examination start date.
- Start time: the examination start time.
- Theme: the examination theme, which can be selected in the dropdown of available themes.
- Auto-score: Outline if the examination will use auto-score or if it will be manual scoring. Auto-scoring means that the exam results will be obtained soon after completing the exam.
- Requires registration: outline if the examination requires registration or if you can write without registration. YES and NO answer options are used. If the “YES” option is selected, another section will display.
- Required claims: outline the registration required claims, which can range from ID, Passport, or a driver’s license.
- Preparation duration (in minutes): add the duration allocated for the exam preparation.
- Identity form: select the form that will be used for identifying candidates. Select from a dropdown list available. The dropdown may consist of the following identity form options:
- Any (meaning any form of identification from the below mentioned)
- Driver’s License.
- Identity Document.
- Passport
- None (meaning no identification is necessary)
- Require uploaded images: specify if there will be uploaded images or not. “YES” and “NO” answer options are used.
- Prohibited objects: outline any prohibited objects that candidates have to be aware of. Use commas to separate data.
Once all these details have been specified. Click on the “Update” button and save the configuration details. You will get a pop-up alert that your changes were successfully updated. You will be redirected to the examination module main page.
Examination Proctoring Configuration
Setup For Examination Proctoring
These are setting that the examination provider needs to configure for the online examinations.
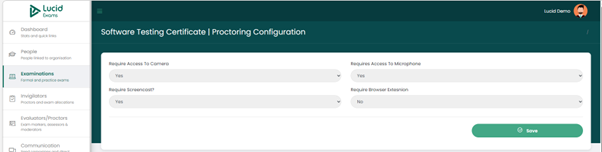
On the exam proctor configuration page, you have to complete the data fields displayed, which consist of questions like:
- Require Access to the camera: choose the “YES” option to require access, or the “NO” option not to require access. By choosing the “Yes” option, it means the proctor will be able to see the students during the exam through the cameras.
- Requires access to the microphone: choose the “YES” option to require access, or the “NO” option not to require access. By choosing the “Yes” option, it means the proctor will be able to communicate with the students during the exam through the microphone.
- Require screencast: choose the “YES” option to require screencast, or the “NO” option not to require screencast. By choosing the “Yes” option, it means the platform will be able to screen record the examination while it is in progress.
- Require browser extension: choose the “YES” option to require browser extension, or the “NO” option not to require browser extension.
Once you have completed your configuration click on the “Save” button to save the configuration. You will get a pop-up alert that your changes were successfully saved. And you will be redirected to the examination module main page.
Proctoring configuration can differ per examination, depending on how you choose to proctor configure each exam.
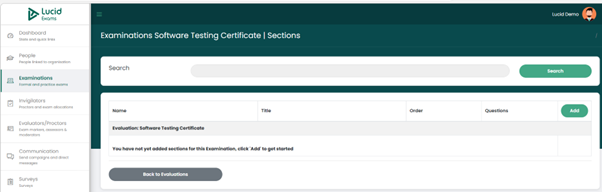
The Examination Sections
Exam Sections For Grouping Test Questions
The examination sections are for grouping your examination questions into sections, for example, you can have a group of multiple-choice questions, true/false questions, completion questions, matching questions, essay questions and many more.
To create the examination section, navigate to the sections page by clicking the “Sections” button on the examination “Options” button to access the dropdown options. You will land on the below page.
Creating Examination Question Sections
Capturing Of Exam Question Sections
Click on the “Add” button to start adding your sections.
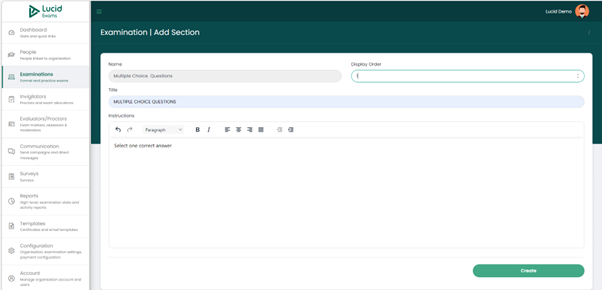
The details that are required when adding the exam section are:
- Name: the name of the section
- Display order: the order of displaying the section.
- Title: the title of the section, might be similar to the name of the section.
- Instructions: the instructions about the section being added, instructions will be visible to candidates.
Once you have captured all the details, you can save by clicking on the “Create” button. You will get a pop-up alert that the examination section was successfully added to the examination. And you will be redirected to the examination module “Section” main page where all created sections are displayed.
The Examination Question Sections Display Page
Captured Examination Question Sections Main Page
All created examination sections are displayed on the Exam section main page.

The data columns displayed on the main page consist of:
- Name: the section name
- Title: the section title
- Order: the order of display
- Questions: the number of questions linked to the section
Under the Section “Options” dropdown, you get the option to edit the exam section and delete the exam section.
You can add as many sections as necessary and link them to available exam questions.
You also have the option to filter when doing your search by entering the section name, or title on the search section and filtering your results.
The BACK TO EVALUATIONS navigation, enables you to get back to the main Examination module page.
Updating Examination Question Sections Information
Editing Exam Question Sections Details
You can make changes to the Examination Section record by clicking on the “Edit” button on the exam section Options dropdown list. The below edit page will be displayed.

You can edit the following data fields:
- Name: the name of the section
- Display order: the display order of the section.
- Title: the title of the section
- Instruction: the section instructions
Once all the details have been updated, click on the “Update” button to save the changes made.
The Examination Questions
Exam Questions
To create the examination questions, navigate to the questions page by clicking the “Questions” button on the examination “Options” dropdown. You will land on the below page.

Creating Examination Questions
Capturing Of Exam Questions
Click on the “Add” button to start adding your exam questions. the below page will open.
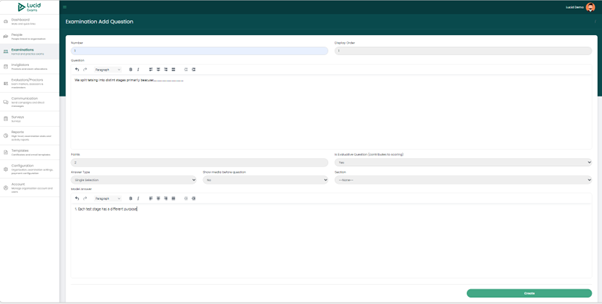
Details that are required when adding the exam questions are:
- Number: the examination question number
- Display order: the examination question display order. The display order and the question number can be different or similar.
- Question: the examination question details
- Points: the number of points allocated for the question
- Is evaluative question (contributes to scoring): outline if the question contributes to scoring by selecting the “YES” option and select the “NO” option if it does not contribute to scoring.
- Answer type: specify the question-answer type by selecting from the dropdown list. The dropdown list may consist of answer-type options like
- Date format
- Long answer/ essay free text
- Multi-selection
- Single selection
- Short answer free text
- Time format
- Show media before the question: outline if there will be any media displayed before the question by selecting the “YES” or “NO” answer options.
- Section: choose the section from the available list of created sections the question will fall under.
- Model answer: type the correct answer for the question that the candidates need to have to get the question correct. This is not visible to the candidates during exam.
- Upload question media: upload the question media if there is any.
Once you have completed capturing all the details. You can save by clicking on the “Create” button. You will get a pop-up alert that the exam question was successfully added to the examination. And you will be redirected to the examination module question main page where all created questions are displayed.
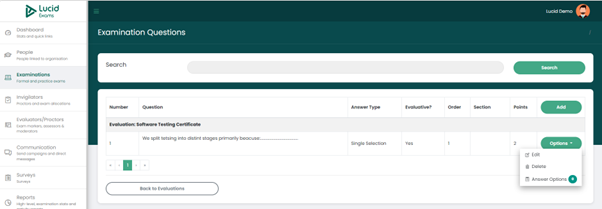
The Examination Questions Display Page
Captured Examination Questions Main Page
The data columns displayed on the main page consist of:
- Number: the question number
- Question: the question details
- Answer type: the question-answer type
- Evaluative: an indication that the question is evaluative or not
- Order: the question display order
- Section: the section the question falls under
- Points: the points allocated to the question
- Question Options button: the “Options’ dropdown will differ per question answer type. For example, multiple choice questions, single selection, and multiple selection answer questions, will have the option to capture the question answer options. Yet the short or long essay free text answer type question will not have that option. However, all questions will have the option to “edit” the question and “delete” the question.
You also have the option to filter when doing your search by entering the question name in the search section and filtering your results.
The BACK TO EVALUATIONS navigation, enables you to get back to the main Examination module page.
Short and long answer free text questions option dropdown

Multiple choice questions, single selection, and multiple selections answer questions option dropdown
Updating Examination Questions Information
Editing Exam Questions Details
You can make changes to the Examination Question record by clicking on the “Edit” button on the Options dropdown list. Below page will display.
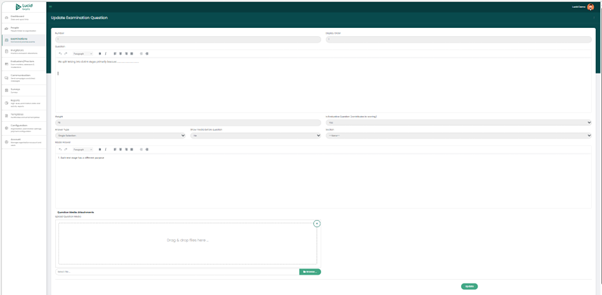
You can edit the following data fields:
- Number: the examination question number
- Display order: the examination question display order. The display order and the question number can be different or similar, depending on how you want the questions to appear on the candidates’ exam.
- Question: the examination question content
- Points: the number of points allocated for the question
- Is evaluative question (contributes to scoring): outline if the question contributes to scoring by selecting the “YES” option or selecting the “NO” option if it does not contribute to scoring.
- Answer type: specify the question-answer type by selecting from the dropdown list. The dropdown list may consist of answer type options like
- Date format
- Long answer/ essay free text
- Multi-selection
- Single selection
- Short answer free text
- Time format
- Show media before the question: outline if there will be any media displayed before the question by selecting the “YES” or “NO” answer option.
- Section: choose the section from the available list of created sections the question will fall under.
- Model answer: type the correct answer for the question that the candidates need to have to get the question correct. This section will only be visible to the evaluators.
- Upload question media: upload the question media if there is any.
Once all the details have been updated, click on the “Update” button to save the changes made.
The Examination Question Answer Options
Examination Questions Answers
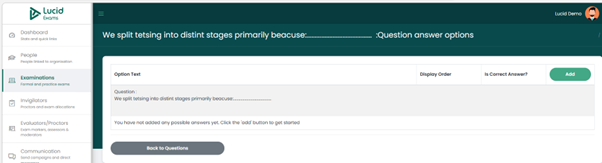
To add answer options for the multiple-choice questions, single-selection, and multiple-selection answer questions, click on the “Answer options” button on the question “Options” dropdown list. The below page will open.
Creating Examination Question Answer Options
Capturing Examination Question Answers
Click on the “Add” button to start adding your exam question answer options. You will land on the below page
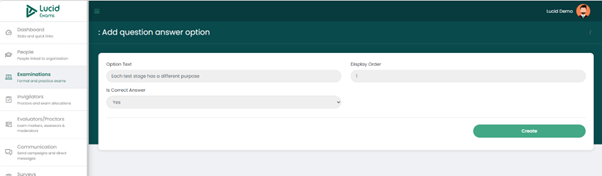
Details that are required when adding the exam questions and answers options are:
- Option text: the answer option text
- Display order: the display order of the answer text.
- Is the correct answer? outline if the answer is the correct one from the available captured answers. Select “YES” if it is the correct answer, and “NO” if it isn’t.
Once you have completed capturing all the details. You can save by clicking on the “Create” button. You will get a pop-up alert that the exam question answer option was successfully added to the question’s answer options. And you will be redirected to the examination module question-answer option main page where all created questions are displayed.
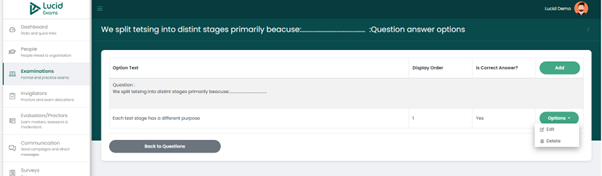
The Examination Question Answer Options Display Page
The Exam Question Answer Options Main page
The data columns displayed on the answer options main page consist of :
- The actual question displaying as the page header.
- Option text: the answer text
- Display order: the answer display order.
- Is the correct answer? indicating if the answer is correct or not, using the “YES” and “NO” options.
- Options: under the options button, there is a dropdown with the option to edit the answer option and to delete the answer option.
The BACK TO QUESTIONS navigation, enables you to get back to the main Examination module Questions page.
Updating Examination Question Answer Options information
Editing Exam Question Answer Options Details
You can make changes to the Examination Question Answer Options record by clicking on the “Edit” button on the Options dropdown list.
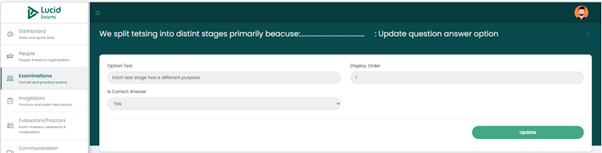
You can edit the following data fields:
- Option text: the answer text
- Display order: the answer display order.
- Is the correct answer: indicating if the answer is correct or not, using the “YES” or “NO” option.
Once all the details have been updated, click on the “Update” button to save the changes made.
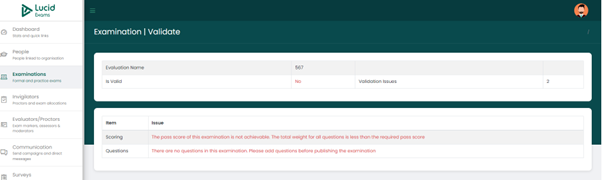
The Examination Validation
Validating Of Examination
Once you have added all your exam questions. Click on the “Validate” option on the Examination module dropdown option to validate the exam.
If the passing score does not correspond with the score for all the added questions, the validation will fail, outlining to you the validation issues obtained, so that you fix and try validating again. But if it does correspond, it will successfully validate the examination.
A successful validation confirmation page

A failed validation confirmation page outlining what the issues are
The Candidates Registered For The Examination
Candidates Registered To Take The Exam
To view all candidates registered for the examination. Navigate to the candidates’ page by clicking the “Candidates” button on the examination “Options” dropdown. You will land on the below page, where all candidates registered are displayed. To add a new or register a candidate, click on the Action dropdown “Register candidate” option.
You have the options to register candidates and export candidates’ records to an excel file.
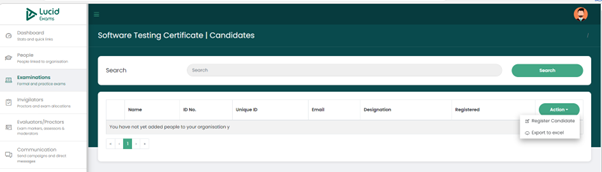
The data field columns displayed on this page are:
- Name: the name of the candidate
- ID No: the identification number of the candidate
- Unique ID: the unique identification number of the candidate
- Email: the email address of the candidate
- Designation: the field of study the candidate is studying
- Registered: the date on which the candidate was registered
- Options: on the options dropdown, you have the option to deregister the candidate.

The Assigned Examination Evaluators (Assessors)
Evaluators Tasked With Assessing Candidates' Exam Scripts
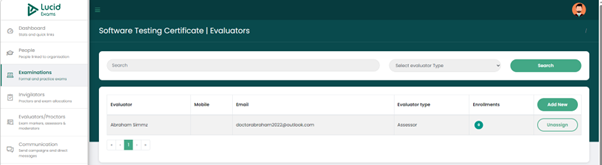
To view assigned or assign evaluators to an examination, navigate to the evaluator’s page by clicking the “Evaluators” button on the examination Options dropdown. You will land on the below page where all available assigned evaluators will be displayed. To Assign new evaluators, click on the “Add new” button.
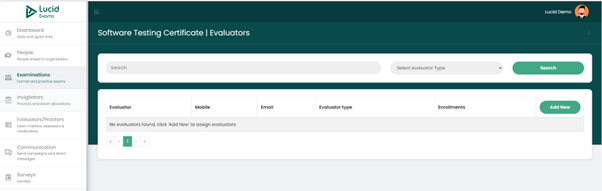
The data field columns available displayed on the Examination Evaluator’s page consist of:
- Evaluator: displays the evaluator’s full name
- Mobile: the evaluator’s mobile number
- Email: the evaluator’s email address
- Evaluator type: the type of evaluator, ranging from an assessor to the moderator.
- Enrolments: the number of candidates enrolled that will be evaluated by the evaluator.
You have the option to unassign an evaluator and to add a new evaluator.
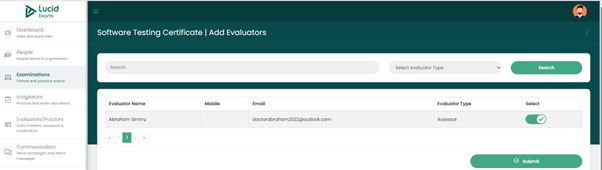
Assigning Evaluators To An Examination To Assess Candidates
Tasking Evaluators With Assessing Candidates' Exam Scripts
If you need to assign more evaluators, click on the “Add new” button, and you will be presented with a list of unassigned available evaluators to select from. Select evaluators to assign, then click on the submit button to assign the evaluators.
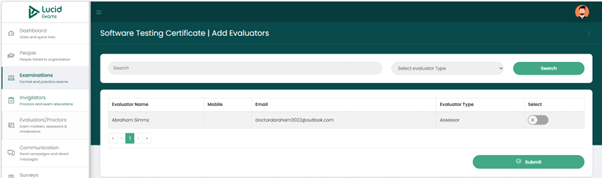
Selected evaluator to assign to the exam.
The Assigned Examination Invigilators (Proctors)
Invigilators Tasked With Proctoring The Examination
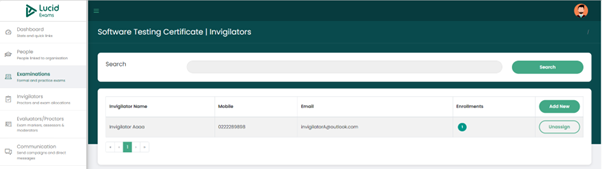
To view assigned and to add new invigilators, navigate to the “invigilators” page by clicking the “Invigilators” button on the examination “Options” dropdown. You will land on the below page. All assigned invigilators will be displayed on this page.
The data field columns on the invigilator page consist of:
- Invigilator name: the name of the invigilator
- Mobile: the contact details of the invigilator
- Email: the email address of the invigilator
- Enrolments: the number of students assigned to the proctor. You can click on the number badge of enrolments to see the enrolled candidates’ details.
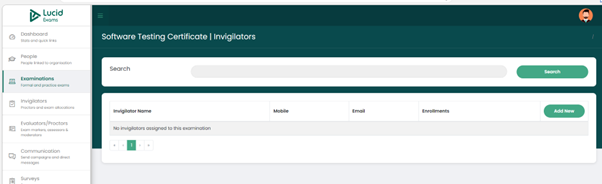
You have the option to unassign and invigilator after assigning.
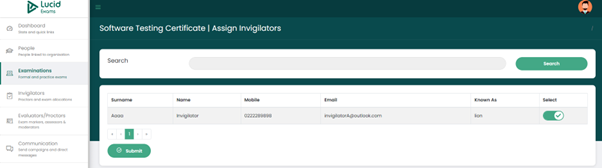
Assigning Invigilators To Proctor An Examination
Tasking Invigilators With Proctoring An Examination
If you need to assign more invigilators, click on the “Add new” button, and you will be presented with a list of unassigned available invigilators to select from. Select invigilators to assign, then click on the submit button to officially assign the invigilators.
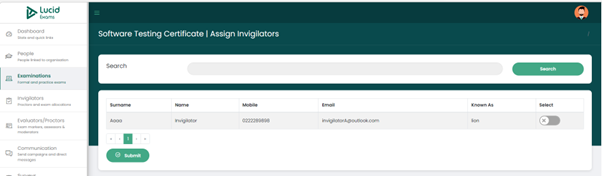
Selected invigilator to assign to the exam.
NOTE: you can only successfully assign invigilators if there are candidates registered for the exam, if not, you will get a confirmation pop-up outlining that you do not have any candidates registered to proctor.